Your skin needs to replace its moisture to stay soft and healthy, but there's no reason to rely on manufactured chemicals to do the job- you can use some natural food items instead. Here's how to make your own skin care products to help you skin maintain its good health and some activities you might enjoy doing.
*** Don't worry, all these experiments are in the book. To check it out you can go in the Resources.***
*** Don't worry, all these experiments are in the book. To check it out you can go in the Resources.***
Easy Skin Scrub
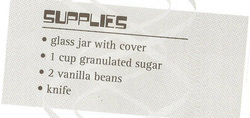
- Fill the glass jar partway with some of the sugar and set aside.
- Split each vanilla bean carefully not to cut all the way through. You're trying to split it open to reveal the seeds inside. Flatten it out and cut it into pieces.
- Layer the rest of the sugar and vanilla bean pieces in the jar, cover it tightly, and set it aside for a few weeks. Make sure it's in a dry place so the sugar doesn't clump.
- When it's ready, sift through and pick out any vanilla chunks.
- To use your scrub, mix a little bit of water with the scented sugar and gently rub it into your face. Rince well and enjoy your smooth skin!
Strawberry Field Mask
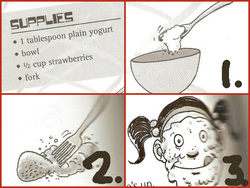
- Put the yogurt into a bowl. Set aside.
- Mash up the strawberries with the fork, then mix them into the yogurt. (It's okay to sneak a bite or two!)
- Spread the mix over your face and let it sit for 20 minutes to deep clean your skin. When the time's up rinse well and pat your skin dry.
Bubble Bath

- Carefully mix everything together. Be careful not to be too vigorous, or else it will all start foaming!
- Pour the mix under running water as you're filling the bathtub.
Bath Fizzles
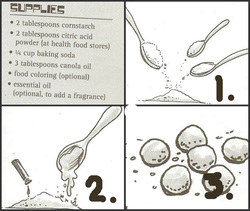
- Mix together the cornstarch, citric acid power, and baking soda.
- Add in the canola oil and mix really well. Add food colouring and then essential oil if you're using them. You'll end up with a soft dough that feels a little crumbly.
- Shape the fizzies into small balls, or press them into molds if you have them.
- Let the fizzies sit for 48 hours. When you're ready to use one, drop it into a warm bath and watch it explode into bubbles.
Make your own Fingerprint Kit
Like a detective, you can "lift" fingerprints from around your home with this fingerprint kit. Skin has oils in it, and when you touch something it leaves an invisible mark shaped like your fingerprint. Use this kit to lift fingerprints from your piggy bank and find out just who's been checking out your funds!
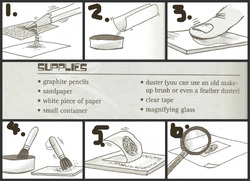
- Sharpen the pencils really well to get started. Hold a pencil and sand paper over a piece of white paper. Begin rubbing the tip of the pencil on the sandpaper vigorously. You'll start shaving down the pencil into a dust that falls onto the paper. (Be careful not to inhale any of this dust!)
- When you've got a good pile of graphite, carefully pick up the paper, roll up two sides gently, and pour your fingerprinting dust into the container. You're ready to hunt for fingerprints!
- To test your kit, press your finger firmly and evenly on a mirror or glass (a flat surface is ideal).
- Gently dip the top of your duster into the fingerprinting dust, and carefully brush it over the print you made. It helps to spin the brush a little bit as you move it over the print. You should be able to make out the print clearly.
- Take a piece of clear tape and firmly smooth it over the print. Then, slowly peel back the tape. You've "lifted" a print onto the tape!
- You can now mount the tape on a white sheet of paper and look at it closely under a magnifying glass. Look for the different patterns made by the ridges.
- You can even print everyone in your house (let them press right on the piece of tape, dust it lightly so you can see it, and mount it on paper). Then, you'll have a record of everyone's prints!
